Showing posts with label onion. Show all posts

Wednesday, April 9, 2014

Slow Cooker Pot Roast a la Liz


     One of the keys to a great relationship is keeping both tummy happy and full. At least this is the case in MY relationships. If I'm hungry, I'm not happy and so is the case with my boo!
     It may be an old adage, but meat and potatoes are the best thing in the world, end of discussion. You've heard it a million times, I know. That's why you can never go wrong with pot roast! Celery, onions, potatoes, carrots and meat all cooking in meat juice? UH, yes, please.


You will need:
  • 1 onion, peeled and quarted
  • 4-5 carrots, peeled and cut into 2-inch segments
  • 3 stalks of celery, cut into 2-inch segments
  • 2 cups beef broth, or 2 beef bouillon cubes diluted in 2 cups of water
  • 1-2 lb. beef pot roast
  • 2 TBSP olive oil
  • salt & pepper

     Heat up the olive oil in a skillet. Meanwhile, salt and pepper both sides of the roast. When the oil gets hot, CAREFULLY place the roast in on a flat side. I say carefully because you WILL get hurt if you slam that piece of meat down and a spritz of hot oil gets on your arms. Take it from me, oil burn scars are not cute. Brown each side of the roast for 5-8 minutes each. Try to brown it.


     Layer the vegetables on the bottom of the slow cooker and season with salt and pepper. I like to put some of them on top of the roast for firmer vegetables. Pour the beef broth in the slow cooker and then top it off with roast. Place the cover, set the heat on low, and leave it alone for 6-8 hours. The longer the better, guys.


     All that's left is too make a big batch of mashed potatoes to soak up all the beef juice! Enjoy,
folks!

Love,

Liz

Tuesday, May 22, 2012

BBQ Meatloaf Done Right

I love meatloaf! A long time ago, my Mama gave me her recipe for BBQ Meatloaf. She actually took an original Martha Stewart recipe and made it much much better with her Mama powers.

As a testament to my love for the loaf of meat, I've revamped an old post of a classic favorite. I added a little bit of my own twist on the recipe. So, get 'cher tummies rumblin' because here we go!

You will need:
  • 1 lb. ground sirloin
  • 1 egg
  • 1 1/4 cup of your favorite BBQ sauce
  • 4 slices of white or wheat bread, diced
  • 1 tsp. of Grey Poupon Mustard
  • 1/2 medium onion diced
  • 1 tbsp. brown sugar
  • 1 tsp. red pepper flakes (optional)
  • 1 tbsp. honey
Preheat your oven to 350 degrees.


Place your bread bits in a medium sized mixing bowl, as seen above. Next add your ground sirloin, onions, egg, and brown sugar. If you want your meatloaf with a kick, add the red pepper flakes now or sprinkle some on after it's done.


Wash your hands because you're about to be wrist deep in raw meat. The best way to mix all the ingredients together is with your bare hands. I know it's gross, but grow up. Thoroughly mix 1 cup of BBQ sauce and Grey Poupon mustard into the meat with a spoon.

Take all the meat out of the mixing bowl and form it into a loaf shape on a greased baking pan. I don't like putting meatloaf in a loaf pan, you might as well be cooking your loaf in a bucket of grease. Moving on, in a small mixing bowl, combine the extra BBQ sauce and honey to make a tasty glaze. Pour the glaze  over the length of the meatloaf. Pop it in the oven for 50 minutes.

Yum! See? And all the grease leaked out. I suggest a side salad and some scalloped potatoes on the side of this meaty treat. Don't forget! The leftovers make fantastic sandwiches!

Love,

Liz

Wednesday, January 18, 2012

Lily's Chili

As you should well be aware of, we're hosting a Chili Cook-Off Reader Giveaway!! Send in your 100% original chili recipes for a chance to win! The winner of the Chili Cook-Off will receive a free copy of The Parchment Paper Cookbook! The Chili Cook-Off ends February 14 so get your recipes in time for Valentine's Day for we all know chili is the food of love.

In the spirit of the Chili Cook-Off, I decided to throw my hat in the ring (of course, I can't win). Last night I gave my sister, the Queen of Soups, if she had a chili recipe and what do you know, she did! I tweaked it a little bit, but pretty much, this is Lily's Chili.

Gather up your fixin's:
  • 1 lb. ground round
  • 1 fat clove of garlic (diced)
  • 1 medium white onion (diced)
  • 1 green bell pepper (sliced and cut into bite size)
  • 1 14.5 oz. can pinto beans
  • 1 14.5 oz. can kidney beans
  • 1 packet chili seasoning
  • 2 red chili peppers (sliced & optional)
  • 3-4 14.5 oz. cans stewed tomatoes
Drizzle a bit of olive oil on the bottom of a big sauce pot and set the heat to medium-low. Brown the ground round with the diced onions and garlic, mix thoroughly. Once the meat is browned through and the onions are translucent, drain the grease out and return the meat mixture to the pot.

Dump out all the stewed tomatoes into a blender or food processor. Give them a couple of quick pulses just to chop them up a bit. Pour the tomatoes into the pot as well as the diced, green bell peppers, chili peppers, beans, and chili seasoning.

Stir up the ingredients well. Keep the pot on medium to medium-low heat at a steady simmer. Stir often and make sure none of the chili is sticking to the bottom. Simmer the chili for 30-90 minutes.

Chili is one of the most versatile foods and one of my favorites. There's so much you can put on it and so much to put it on! Hamburgers, baked potatoes, tortillas, nachos, french fries, and my personal favorite, the CHILI DOG!

As for my chili dogs and my chili fries, I need it with as many toppings as I can fit. Sour cream, shredded cheese, chives, tortilla chips, diced onions, crackers, or jalapenos, whatever you got - I'll top it on.

A recipe that takes a long time to cook always seems a little daunting to prepare. I hope I've successfully demonstrated how truly easy it is to make. The total preparation time couldn't have taken more than 15 minutes!

I hope this inspires you all to turn in some terrific chili recipes for the Chili Cook-Off and Reader Give Away. Don't forget to get those recipes in before 2/14/12, that's this Valentine's Day! Good luck and good appetite.

Love,

Liz

    Monday, February 21, 2011

    Bacon Stuffed Pork Chops!!


    I must be channeling Paula Deen to be putting so much pork in one place, but I can't help myself! This is so good. And I promise you, it's much healthier than anything Paula Deen the Ham Queen ever made. Ham butter? Ew.

    So, I basically took my Nanny's stuffed pork chops recipe and added a few things.

    You will need:
    • 2 thick cut pork chops
    • 2 celery stalks
    • 1 onion
    • 1 TBSP butter
    • garlic powder
    • salt
    • pepper
    • lemon (optional)
    • 1 box herb stuffing
    • 2 strips thick cut bacon
    Preheat the oven to 425.
    First, fry up them bacons. If you don't know how to prepare bacon at your age, that's a shame and I pity you. Heat up the pan, fry on med-high heat for about 5-7 minutes on each side. ANYWAY, while that's going on, take this time to cut your celery stalks into long quarters and dice them. Then, dice up that onion, too.
    Heat up a small skillet and put the butter in there. Now sautee your vegetable at a medium heat until tender. Season with salt, pepper, and garlic powder then remove from heat. Once the bacon is cooked evenly, remove from the pan and place on a paper towel to degrease them. make sure to blot both sides thoroughly. Let the bacon cool and then rip it into little bits with your fingers.

    Follow the directions on the stuffing box then add vegetables and bacon chunks, mix it up, pop the cover on and remove from heat.

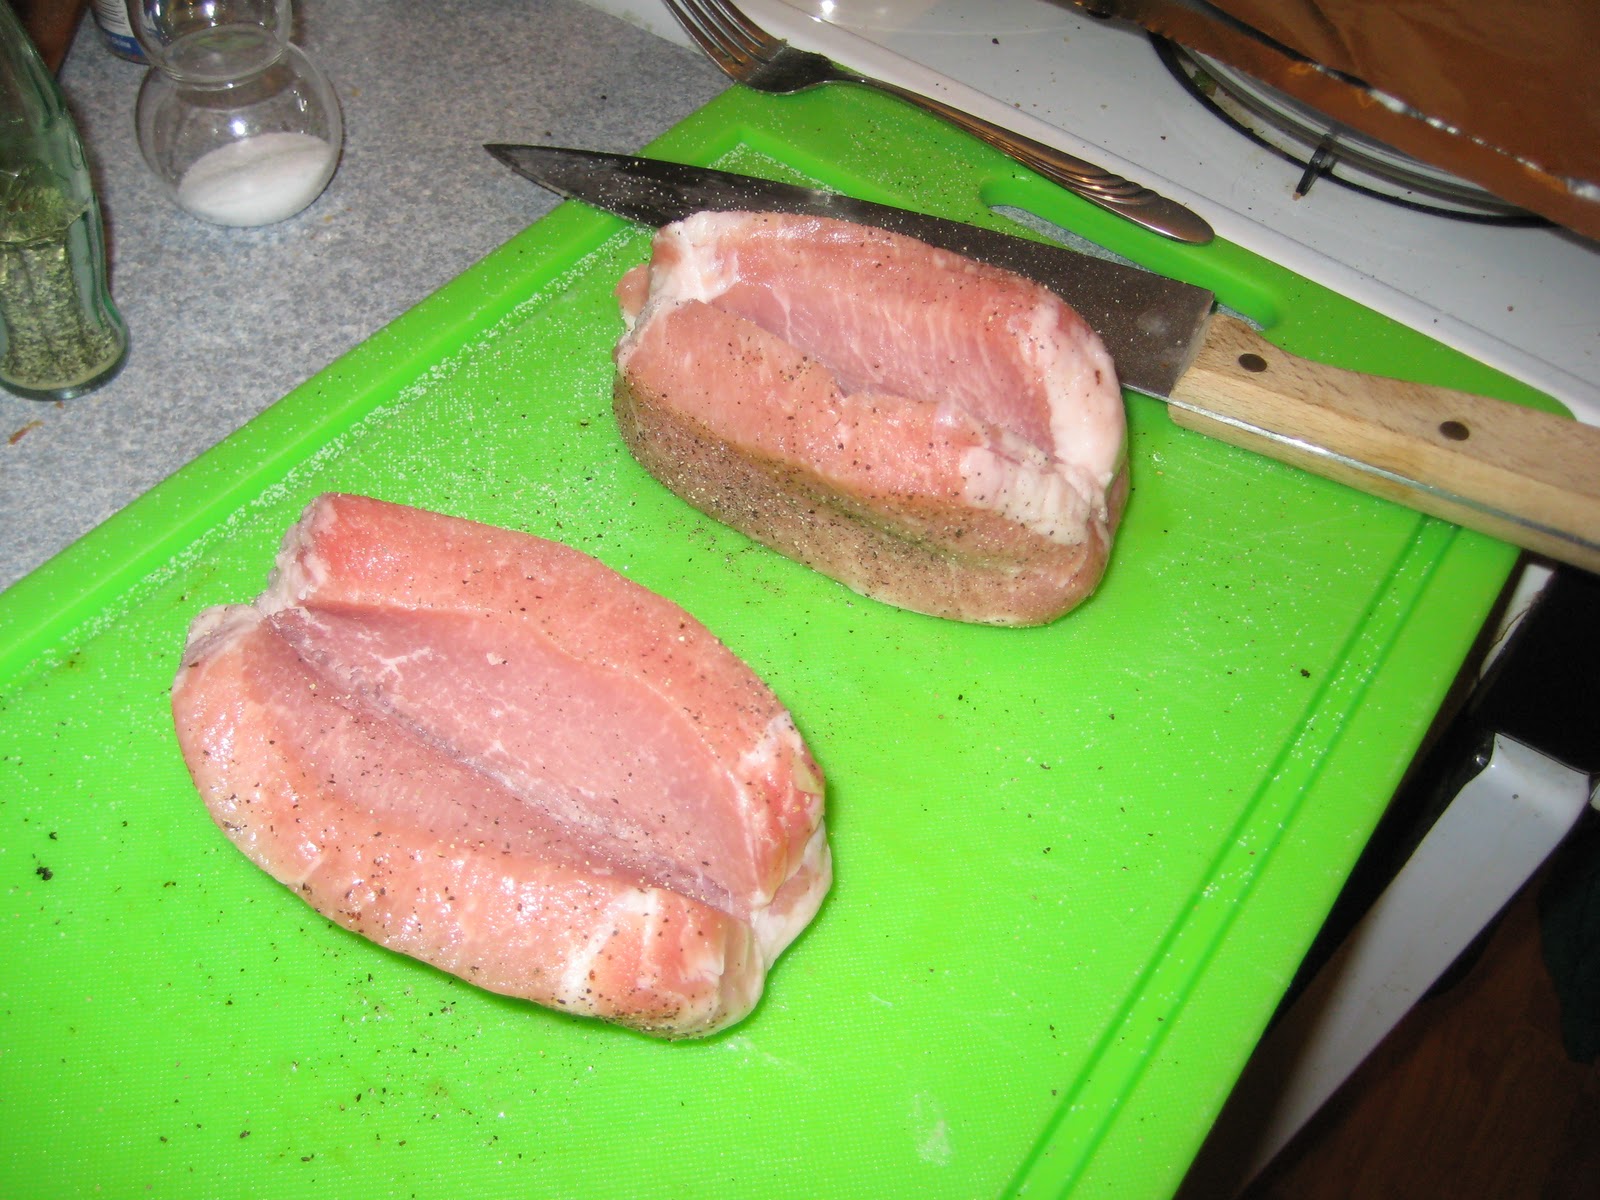
    While the stuffing is sitting, season the pork chops on each side with salt and pepper. Get a big, sharp knife and make an incision in the middle on the long side where there's no fat (it's easier). Make it sort of a curved cut so that the stuffing has a pocket to rest in. And yes this looks hilarious, but please, soldier on.
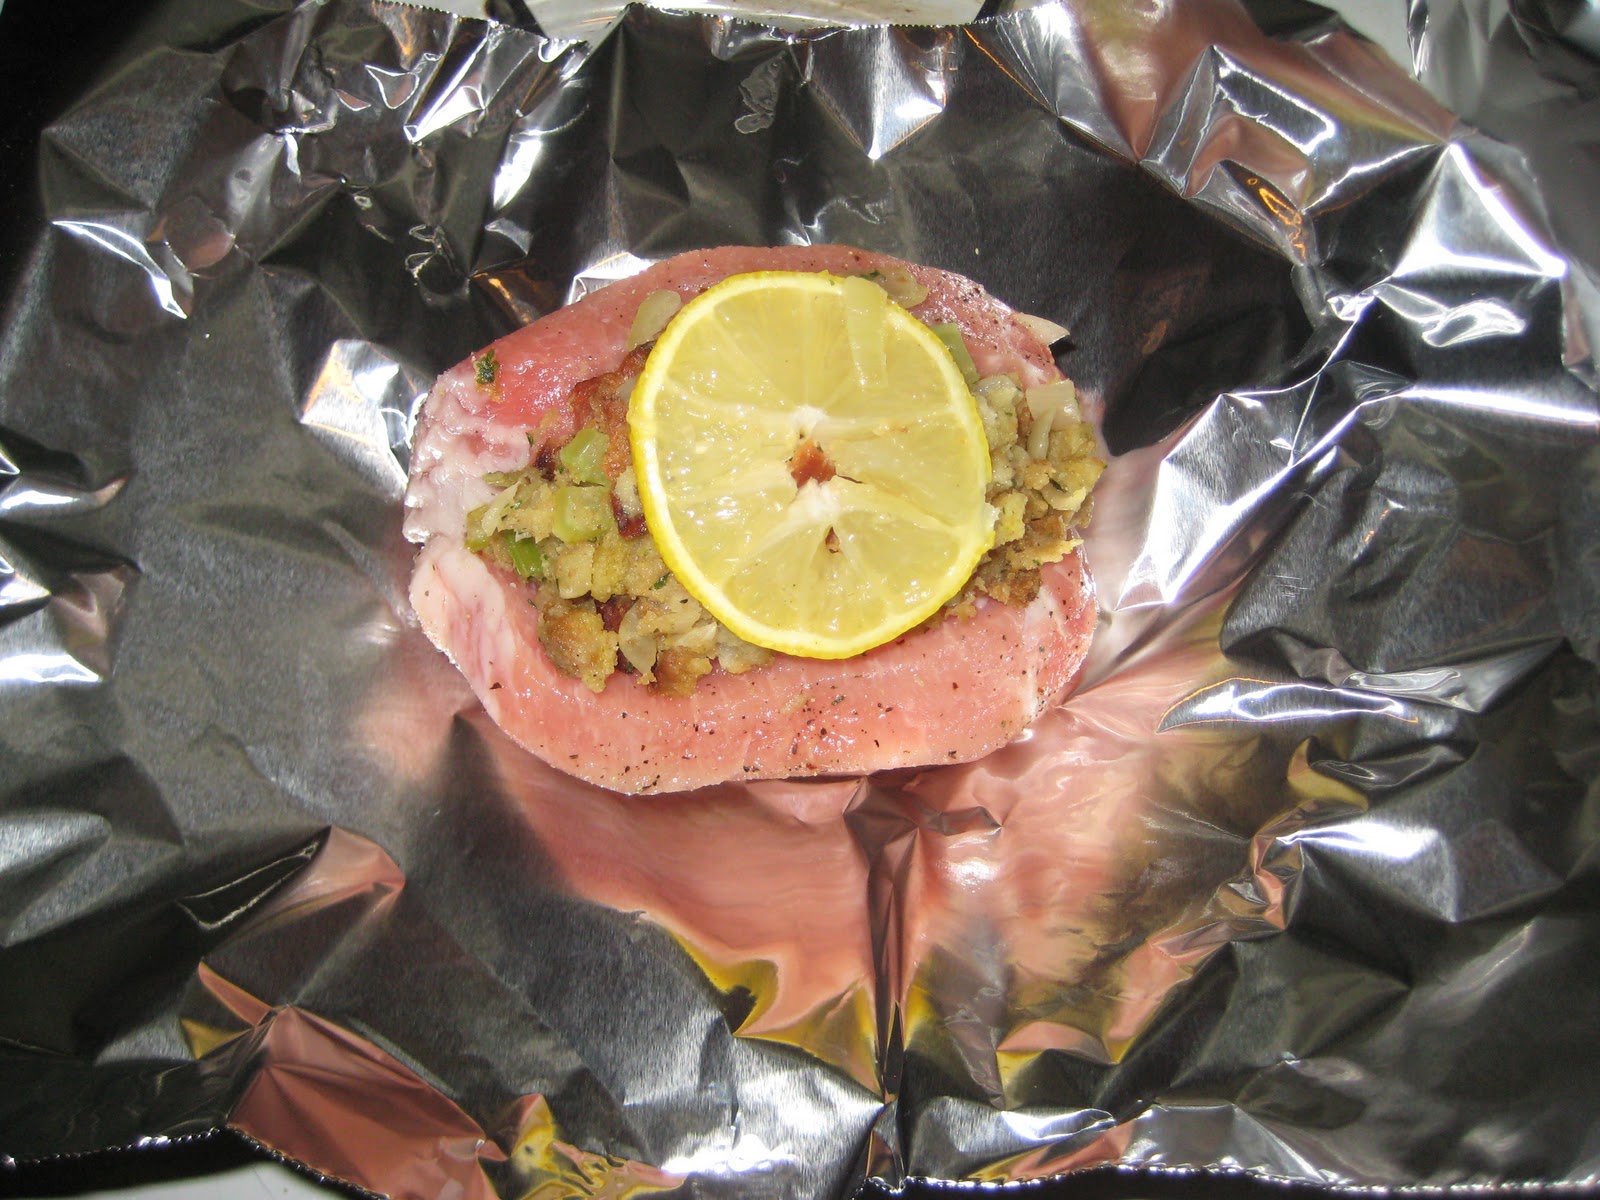
    Set aside about 2 cups of stuffing so that you're not re-dipping with a spoon covered in raw pork. Spoon in the stuffing and really pack it in there. Now get two lemon slices and place them on top on the stuffing. You don't have to, but it's pretty and adds a nice light flavor.
    Wrap the pork chops in separate aluminum foil sheets so that they close at the top. Place them in a baking dish and bake for 40 minutes. Then, open foil and bake for another 5-8 minutes to give the stuffing a crispy shell.
    Oh, my God. This stuffing is so good. Mmmmmm, pig meat.

    Love,

    Liz

    P.S. Always make sure to cook all pork products thoroughly otherwise, YOU WILL DIE.

    Thursday, January 20, 2011

    Lemon Mustard Pot Roast

    Yeah, it's as good as it sounds.

    I miss my Nanny. She's THE BEST at comfort foods. American Cop Suey, Shepherd's Pie, mashed potatoes with beef strips cooked in gravy, mmmmmmmmmm, and pot roast, she made it all! So when I miss her I cook.


    You will need:
    • 2-3 yellow potatoes
    • 2-3 carrots
    • 2-3 celery stalks
    • 1 onion
    • 1/2 lemon
    • 2 beef bouillon cubes
    • salt
    • pepper
    • 1 1/2 cups water
    • 2-3 TBSP Dijon mustard
    • beef roast (chuck, del monico, sirloin)

    First preheat your oven to 350. Cut up your potatoes, carrots, onion, and celery stalks into quarters. Salt and pepper roast, then slather on the mustard with a knife (definitely avoid double dipping out of the mustard jar). Place the roast in a deep baking dish with a lid and surround with vegetables. Pour in water, then salt and pepper. Cut 2 slices of lemon and place them on the roast. Plop in the bouillon cube, slap on the lid, and slam that roast in the oven.


    Cook 15- 20 minutes per pound and voila! It's great out of the oven and as leftovers. There's nothing quite like a pot roast sandwich with a little butter.

    Love,
    Liz

    Sunday, September 20, 2009

    Spicy BBQ Lamb Rack

    If ya feel like being fancy but, ya know, not so much. So good. So easy. Soooooo not so cheap. Ok, a rack of lamb can run you from about $15-25 even higher depending on how much baa you want for your buck (Oh, God, that was painful punny, I'm sorry). But just stow this idea away for a rainy day when you want to make something nice for your boo, or impress a bunch of people, or feel like Uncle Moneybags.

    What you need:

    • rack of lamb, get it from a nice grocery store. Not your Kroger or Stop N' Shop. Nay nay, go all out and get it from Whole Foods or something. It'll be a leaner and better cut.
    • Bone Suckin' Sauce, I got the spicy kind, gurggle gurggle, drool drool. This might be hard to find so you can use whatever kind of BBQ sauce you want. But this is better.
    • salt
    • black pepper
    • 1-2 small-medium size onions, this is to put on top of the lamb while it bakes. This makes the onions soak in some of the BBQ sauce while they caramelize. Nummy.
    Alright, now take your lamb out of the packaging, rinse it and LEAVE THE FAT ON! Just do it. You can cut it off later if its so important. Place it in a baking dish of some sort, one with raised edges, NO baking sheets. If you use a baking sheet there will be a mess.


    Coat all side of lamb rack with a light, even coat or salt and pepper. Make sure you get the ends and obviously don't waste too much of your time with the bone part.

    Next, liberally base your lamb with BBQ sauce. As you can see, mine are laying in a puddle of joy. (Why I used a round dish, I'll never know.) Now's a good time to cut up those onions and sprinkle them around and on top of the lamb.

    Here comes the waiting. I think I might have marinated my lamb for about 36-48 hours. Mostly because I kept forgetting. You don't have to marinate that long of course, 4-6 hours will probably do it. Just keep it mind the longer you marinate the better, the juicier. The less you marinate, not so much. But don't keep raw meat in your fridge too long or it will spoil and be nasty as hell.

    Whenever you've decided you're done marinating, pre-heat the oven to 400-450. Yeah that's high, but here's kicker, you're gonna leave it in there a while. Like, a WHILE. Check on it after an hour, makes sure it's not burning, but I guarantee you, it's not done yet. Take another hour, nope, still too raw.

    Now depending on how your like your meat, you might want to stop at around hour 3. Like I said, at this point it's up to you. I prefer my meat well-done.


    After about 4 hours, this is what I came out with. First time ever making something like this, they came out soo juicy. Those are honey butter peas on the side, 1 can peas, 2 TBSP of butter, drizzle of honey. I happened to share this meal with a fervent vegetarian who had never tried lamb before. Unfortunately, I have the appetite of Shaggy and could have easily eaten the entire rack and barely been satiated. Oh, well. Sharing is caring.

    Love,

    Liz