Showing posts with label Elizabeth Querusio. Show all posts

Tuesday, April 26, 2016

$5 Recipes, My Ass

     It happens to the best of us. We run out funds towards the end of the month. The grocery budget takes a hit to take care of an unusually high electric bill or car payments. To make your dollar stretch, you look up a recipe that's ingredients only cost a few dollars. FIVE DOLLARS? FOR A WHOLE MEAL? What a find! The recipe looks delicious, has a high rating, and the food to dollar ratio is mouth-watering. You get your grocery list compiled and head to the store.
     But when you get there, you find that you can't simply buy ONE carrot, or THREE eggs, or 1/4 teaspoon of nutmeg! I mean, where is the customer service? Not really.
     Of course, I don't speak for every $5 recipe or the like. But a lot of these recipes depend on the cook already having an available supply if they don't have a farmers market to waltz into. If ONLY I had a farmers market to waltz in whilst I pick produce.
     For people like me, who get so completely broke they have no idea how it happened, aka irresponsible, or other people who are just on a tight income, these recipes are completely deceptive. I'm no extreme couponer or spread sheet wizard, but how do these cooks go through their pantry and quantify every drop of soy sauce into a dollar amount? How can you tell me this recipe with seventeen ingredients costs under $5?
     I'm not saying it's impossible, in fact, it's very commendable. If you can sit down and plan out an entire months worth of recipes, correlating ingredients, calculating the cost of each recipe into the amount of each ingredient, God speed and good luck! I wish I were more like you.
     However, food staples aren't exactly bountiful at the end of the month so you're kind of tapping an empty keg. A lot of these recipes assume you have a lot of ingredients on hand. So if you don't have an crushed red pepper in the first place, good luck trying to convince the Stop N' Shop manager to sell you $0.34 worth.

     I must say that this recipe in particular is priceless, Pasta Carbonara with Leeks & Sun-Dried Tomatoes. It's looks scrumptious, of course. The author of this recipe must live on a pig farm because they can find 3/4 lbs. of THICK CUT BACON, not just the shitty breakfast kind, THICK CUT BACON for less than $5. Nevermind the rest of the ingredients in this mini-Martha Stewart meal that combined with bacon should only cost $5, where in America are you going to find THICK CUT BACON for under $5? This is real question that needs to be answered if it can indeed be confirmed.
     Here's another classic, Shrimp and Spaghetti Squash! I'd LOVE to know what gutter they dredged out an entire pound of shrimp for under $5. It can't be done! Even if you found a magic coupon, you'd still have a spaghetti squash to buy as well as parsley and at least two lemons. Once again, Kroger is not going to let you buy two sprigs of parsley out of a bunch. This isn't some antiquated, cheery outlook on cooking from before the recession. These recipes were posted last year! In the same economic climate that you and I live in. So what's the secret?
     Is Allen Greenspan writing these recipes?
     Is there a special market I'm not privy to?
     Does Dollar General sell meat now?
     How can they, in good conscious, tell people that a recipe costs $5 to make when they clearly haven't stepped into a grocery store since the 1980s?
     In conclusion, my fair people, I call bullshit on most $5 recipes. But of course, the rule of three compels me to give you YET another example of why most $5 recipes are unrealistic. This Pretzel Tuna Melt seems doable until you get down to the $0.15 you'll be spending on mayonnaise. So once again, you'd have to already have this items. Mayo might not be as rare as some other ingredients. Perhaps as an alternative, they should suggest you grab a mayo packet from the deli. Regardless, they're not going to let you buy one stalk of celery. However, you could save the side portions of celery from your next hot wings venture. I will say that the slice of tomato was absolutely NOT mentioned in the ingredients list and only serves to aggravate me. I also choose this recipe because tuna melts gross me out.
    Some of these recipes look tasty, but I can't get past the ridiculous gimmick. I feel violated and bamboozled. The majority of these recipes cost much more to make than advertised. Frankly, I don't have energy to waste on LIARS! LIARS! All of them are LIARS and CHARLATANS!! Ahem.
     Anyway.

     Love,

     Liz

Saturday, January 16, 2016

Dave's Kielbasa & Beans


My boyfriend likes to relax whilst cooking.
     The way to my heart, HUGE SURPRISE, is through my stomach. For the first time in my life, I have a real man of a man and he can FEED ME. This is one of my favorite go-to quick weeknight meals when I need yummies pronto. A tasty bonus is that the cost of this meal is low but the flavor content is high, high, HIGH! Four basic ingredients and roughly 45 minutes of your time is all it takes to make Dave's Kielbasa & Beans!

     You will need:


     Heat up a skillet and put in the pad of butter. Once the butter is almost sizzling, dump in the diced onion. Stir that onion around in the pan so the butter is everywhere. You want the onions to cook long enough so that they're clear and leaving an almost dry trail through the butter. The baked beans come next and you can just pour those right in and stir until the onions are thoroughly mixed in. If it seems like your beans are getting dry, add a half cup of water. The extra water will just burn off anyway.


     Stir those beans up every so often until they come to a nice simmer. Now you can add in your kielbasa and mix it in so it gets nice and coated in the beans and sauce. The kielbasa is already cooked, so all your really doing is heating it up in delicious bean juice so it takes on some of the flavors.

     In 15-20 minutes, you'll have a hot plate of Dave's Kielbasa & Beans! This recipe is great whether you want to serve it on a bun with mustard or straight up in a bowl so I can shovel it into my face as gracefully as I can.

Steamy, sensational, succulence!
      Here in Rhode Island we have Central Falls Provision kielbasa made RIGHT HERE!! It's literally made in the same state that we're eating it in. Very nice, very nice. Support your local businesses people! Not only that, the closer to home your food is made, the fresher you get it! Don't be jealous, be a smart shopper.

     Now you get a small taste of what I've been getting these last three years back home in Little Rhody (nobody calls it that). Just wait til you see what we make next!

This time, love,

Liz & Dave

Saturday, September 19, 2015

My Mama's Garlic Bread

Crispy, buttery, garlic PERFECTION.

I noticed a lot of garlic bread recipes call for an ass-load of butter mixed with garlic and herbs - but that's not Mama's way. The amount of butter some people use is, well, grotesque. Remember people, this is a SIDE. It's not supposed to contain enough calories to solidify the cholesterol in your arteries. It's supposed to be yummy!

Super simple, here we go.


You will need:
  • SO MUCH GARLIC, 4-5 nice-sized cloves, diced up super tiny
  • Nice, sliced, crusty bread, preferably
  • 2-4 TBSP olive oil
  • 2-3 TBSP butter
Preheat the oven to 450 OR use your toaster oven!


Heat a skillet over medium heat. Give it a moment to let the pan heat up then add the butter. Coat the pan with the butter while it's melting. Sop up the butter with the bread slices on both sides, then set them aside. Now add the olive oil to the skillet and let it get hot.


Test the oil to see if it's hot by dropping one piece of garlic into the skillet. If it sizzles, stir in the rest of the garlic. Gently stir the garlic around until it's aromatic, or the smell of garlic permeates your kitchen. Take your pre-buttered bread and smoosh it onto the hot garlic oil. Press a few times until the bread slice has picked up a good amount of garlic bits.


Depending on how crispy you like your garlic bread, put the slices on a pan for less crispy and straight on the oven rack if you like it extra crunchy! About 5-6 minutes should do it. Wait for it to cool, though, or risk burning your dainty little fingers. Have it with your pasta, lasagna, lamb chops, or, MY FAVORITE, broccoli cheddar soup!

Thursday, January 15, 2015

Chocolate Blackberry Cobbler for 2!

I left my big container of Swiss Miss at my boyfriend's house, so this weekend I have no constant source of chocolate. OH, WAIT! There's something up my sleeve . . .

BLACKBERRIES & CHOCOLATE CHIPS!!

What does that mean? COBBLER.

You will need:
  • 6 oz. blackberries, washed and dried
  • 1/2 cup chocolate chips
  • 1/2 cup flour
  • 1/2 cup brown sugar
  • 1/2 butter, melted
  • 1/2 cup milk
Preheat the oven to 375 and grease a small baking dish, around 6x6.


Combine flour and sugar in a medium-sized mixing bowl. Next pour the melted butter over the mixture. Next add the milk and whisk until the batter is smooth.

Pour the batter into the greased baking dish. Place the blackberries evenly over the batter followed by the chocolate chips.

Bake for 40-45 minutes or until you can poke it with a tooth pick and no batter comes off on it.


A sweet and tart treat that is tasty enough to trick me into eating fruit - WONDERFUL! This recipe makes enough for 2-3 people OR 1 chocolate obsessed person with a sweet tooth that don't give a DAMN.

Love,

Liz

Wednesday, August 20, 2014

Cheesy Zucchini Rice

     I saw this recipe on a different blog and I thought to myself, "I can make that better." And so I did.

     If you're wondering what Cheesy Zucchini Rice is, you might not be that quick on the uptake. It's exactly what it sounds like and best of all you can customize this dish to your preference! Originally, this recipe had "shredded zucchini in it, but I prefer a crunch to my vegetables. So this time, we're going to get out the peeler and do our very best to peel a zucchini or two. And it just so happens that I GREW a HUGE zucchini in my very own garden this Summer, BAM!


You will need:
  • 1 medium OR 2 small zucchini(s), peeled approximately 2 cups
  • 1 cup rice
  • 2 cups chicken broth OR 2 cups water and 2 chicken bouillon cubes
  • 1 cup sharp Cheddar cheese, OR go FANCY and use 1/3 cup Mozzarella, 1/3 cup Parmesan, and 1/3 cup Gruyere
  • 1/2 TSP garlic powder
  • salt and pepper to your liking
  • 1-2 TBSP milk (optional if it comes out too thick)


     Start with the rice first. This whole process should take under 25 minutes. Boil the chicken broth in a small sauce pot and then add the rice. While the rice is cooking, we're going to prep everything else.


     Peel your zucchini, and then chop them up into bite-size pieces. Grate the cheese or cheeses of you choosing. This is where you can really customize this dish. It can be totally kid friendly or parent-pleasing. Either way, you will receive rounds of applause for this little jewel!

   
     When the rice is done after about 20 minutes, remove it from heat and quickly add all of the ingredients. All that remains is to stir it up until all of the cheese is melted.

     The heat from the rice actually cooks the zucchini just enough so that it's not raw but still crunchy! This is also an excellent way to sneak some vegetables into your diet without being overwhelmed by all that green. Don't judge me!


     Ok, well - I hope you like Cheesy Zucchini Rice as much as my people and I do. I've had to make it twice this week.

Love,

Liz

Tuesday, May 6, 2014

Candied Pecan Chocolate Chip Cookies, Y'all!


I missed my stepfather's birthday this year. Yeah, I know - I'm the worst. But trust me, I have an excellent excuse. I had his birthday saved in my old phone on the calendar, but it got lost when my stepfather gave me a new phone for Christmas. So, if you think about it . . . it's really all his fault. To make up for it, I decided to make him a treat because he's almost sixty and can pretty much buy anything he actually wants.


You will need:
Cookie Dough:
  • 2 1/4 cup flour
  • 1 TSP baking soda
  • 1 TSP salt
  • 2 sticks of soft butter
  • 1 1/4 cup brown sugar
  • 1/4 cup white sugar
  • 1 TSP vanilla extract
  • 2 large eggs
  • 2 cups semi-sweet chocolate chips
 Candied Pecans:
  • 1 cup pecans, whole or chopped
  • 2 TBSP brown sugar
  • 2 TBSP butter
Preheat your oven to 375.

Get a large bowl and mix up the white sugar, brown sugar, butter, and vanilla extract until it's creamy. Add the eggs in one at a time and make sure you mix them in all the way. Otherwise, you could get scrumptious chunks of cooked egg in your cookies.

In a small bowl, combine salt, flour, and baking soda. Spill some of the flour mixture into the sugar mixture and mix it real well. Continue adding the flour mixture a little bit at a time making sure it's incorporated completely it has become some tasty-delicious cookie dough.


Next add the chocolate chips and we can move on to the star of this cookie show!


THE CANDIED PECANS.

This is so serious y'all. Pecans are a big deal in the South, but they're just as tasty up here in the slowly-thawing North.


Get a small frying pan, preferably, set it on medium and start melting that butter. Drop in one pecan at a time until the butter starts sizzling, then dump in the rest of the nuts and brown sugar. Use a spatula to mix it all around in the pan and really get those pecans coated in the butter and sugar.


Let them simmer for 5-8 minutes on medium and then remove it from heat completely. I left mine on the stove and the sugar caramelized onto the bottom of the pan, womp, womp.

Stir the candied pecans into the cookie dough. Roll the cookie dough into about the size of a golf ball and set up nine on a cookie sheet. Make sure they're spread evenly apart, unless you like twin cookies. Bake them for 9-12 minutes. I made three pans worth of cookies, nine each which makes twenty-seven cookies all together.


I don't know if my stepfather likes them. I haven't heard from him since I gave him the cookies so I assume his mouth is too jammed full to speak.

Wednesday, April 9, 2014

Slow Cooker Pot Roast a la Liz


     One of the keys to a great relationship is keeping both tummy happy and full. At least this is the case in MY relationships. If I'm hungry, I'm not happy and so is the case with my boo!
     It may be an old adage, but meat and potatoes are the best thing in the world, end of discussion. You've heard it a million times, I know. That's why you can never go wrong with pot roast! Celery, onions, potatoes, carrots and meat all cooking in meat juice? UH, yes, please.


You will need:
  • 1 onion, peeled and quarted
  • 4-5 carrots, peeled and cut into 2-inch segments
  • 3 stalks of celery, cut into 2-inch segments
  • 2 cups beef broth, or 2 beef bouillon cubes diluted in 2 cups of water
  • 1-2 lb. beef pot roast
  • 2 TBSP olive oil
  • salt & pepper

     Heat up the olive oil in a skillet. Meanwhile, salt and pepper both sides of the roast. When the oil gets hot, CAREFULLY place the roast in on a flat side. I say carefully because you WILL get hurt if you slam that piece of meat down and a spritz of hot oil gets on your arms. Take it from me, oil burn scars are not cute. Brown each side of the roast for 5-8 minutes each. Try to brown it.


     Layer the vegetables on the bottom of the slow cooker and season with salt and pepper. I like to put some of them on top of the roast for firmer vegetables. Pour the beef broth in the slow cooker and then top it off with roast. Place the cover, set the heat on low, and leave it alone for 6-8 hours. The longer the better, guys.


     All that's left is too make a big batch of mashed potatoes to soak up all the beef juice! Enjoy,
folks!

Love,

Liz

Tuesday, March 18, 2014

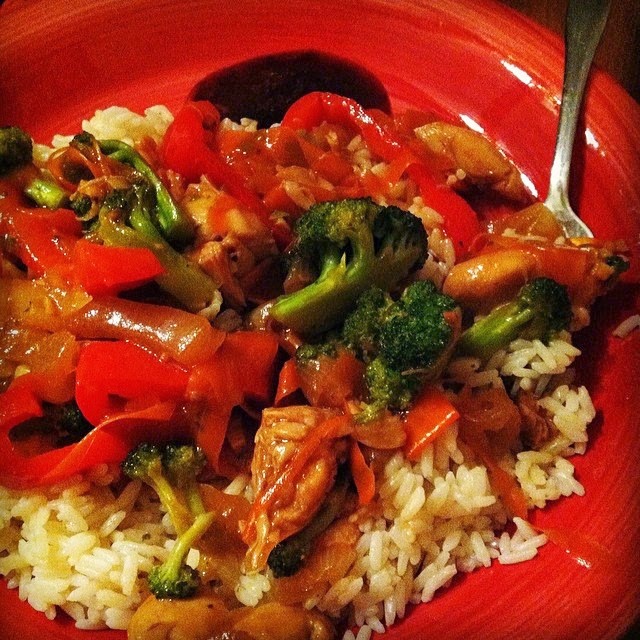
Korean Teriyaki Chicken Stir Fry

     Yesterday, I was in a tight spot. I had $40 to cover my groceries and it was my turn to cook dinner that night. I went through a lot of options but I settled on something that had lots of inexpensive vegetables, to make up the bulk of the dish, and a inexpensive cut of meat preferably on sale. Also, more important than anything else - it HAD to be good.
     For the first time EVER, I'm faced with a beau who can produce more in the kitchen than fried eggs. The first meal this guy made me was muscles in a tomato-white wine sauce. What the Hell?! Nobody does that in real life! He's amazing so I can't just slap down some tacos seasoned from a packet anymore.
     Given the circumstances and budget, the fact that he likes Asian cuisine, I picked stir-fry. I am SO GLAD I DID! Needless to say, my beau contributed a lot to this recipe. We used one of his woks, because of course he has more than one! I might have prepped but he had a hand in a lot of the cooking process due to his stir-fry history.

You will need:
  • 1 lb. chicken strips OR chicken breasts, cut into thumb-sized chunks
  • 1 onion, cut into semi-circles
  • 1 red pepper, cut into 2-inch strips
  • 1 small broccoli floret, chopped
  • 1 fat garlic clove, diced
  • 1 chicken bouillon cube
  • fresh ginger, one-inch piece, diced
  • 2-3 carrots, peeled into strips
  • 2 TBSP vegetable oil
  • 3/4 cup Tsang's Korean Teriyaki Stir-Fry Sauce
  • 3/4 cup soy sauce, I like the low sodium kind
  • 1 cup par-boiled rice
  • 2 cups water
      Grab a small, resealable plastic bag and put in the chicken chunks, garlic, ginger, 1/2 cup Tsang's Korean Teriyaki Stir-Fry Sauce, and 1/2 cup soy sauce. Before you seal the bag, try to get out all of the air that you can, then toss it in the fridge for 30 minutes. While the chicken is speed-marinating, this is the time to prepare your vegetables and rice.
     My beau introduced me to par-boiled rice. It's nice and tender and I LOVE IT! Get your water boiling and then break up the bouillon cube in the water, then add the rice and cover. Let the rice boil for about 30-60 seconds then reduce the heat to low. Stir once or twice for the next 15 minutes then turn off the heat and stir. If there's rice sticking to the bottom just put the cover back on for about five minutes then stir. The moisture should lift the rice up off the bottom of the pot.


Heat the vegetable oil in your wok or frying pan on medium high heat. Once the oil is hot carefully pour in the chicken mixture, try to get whatever is leftover in the bag out into the pan. Cook the chicken for a about 2-3 minutes. Add the vegetables and the rest of the Tsang's Korean Teriyaki Stir-Fry Sauce and soy sauce.


     Remember: KEEP STIRRING, that's the point of stir-fry. The vegetables should be cooked but still crisp. Stir every 30 seconds or so for the next 10-13 minutes then you're done!
     I like to plate the rice first and then layer on the goodness so the rice soaks up the run off sauces. Scrumpty!

Love,

Liz

Tuesday, March 4, 2014

Simple Sausage Marinara

I've made this a few times now and I find it super savory! This red sauce with sausage is super easy. Its one of those meals you do a bunch of prep work for, and then you relax while the sauce simmers it's way into the juiciest parts of the sausage. Let's get started.

You will need:
  • 6 hot or sweet Italian sausage, whichever you prefer or mix it up
  • 14 oz. can of crushed tomatoes
  • 14 oz. can of whole peeled or diced tomatoes
  • 1 yellow onion, diced
  • 2-3 cloves of garlic, diced
  • fistful of basil, chopped
  • salt & pepper to your taste
  • olive oil
Start prepping by filling a medium sauce pot 2/3 full of water. Set that on medium-high heat and let it come to a boil while you're dicing up the onion, garlic, and basil.

Pour olive oil into a large sauce pot, enough to cover the bottom of the pot, and put it on medium-low heat. Once the olive oil has heated up a bit, dump in the diced onion. Let the onion cook until it looks a little translucent and then stir the onions to the sides of the pot to make a little landing pad for the garlic. Let the onion and garlic simmer for a while until the garlic looks yellow, then stir it up. If the onions start to burn or cook to quickly, definitely turn the heat down.

Before you place the sausage in the boiling water, use a fork to poke each sausage three or four times. Let the sausages cook for 4-6 minutes each at the most. After they're done, I like to cut them into twos or threes so the sauce gets in. My Nonno (grandfather) preferred cooking them whole. It's alright if they aren't cooked through because they're going to be in the sauce which is still thickening.


Turn the heat way down and let your sauce simmer for at least 30 minutes. I like to simmer my sauce for as long as possible. Well, go try this and tell me what you think. Whatever, you'll like it.

Love,

Liz

Wednesday, January 8, 2014

Healthy Broccoli Cheddar Soup

I'm OBSESSED with Panera's soup. But I don't always feel like driving 10 minutes down the street to get it in the cold snowy, snow. PLUS, I don't want to spend $7 on a bowl of soup that is in no way big enough to satisfy a hunger like mine. After a lot of prodding and nagging, I finally gave in to myself and took a swing at making this creamy, cheesy concoction last Friday night.
I based this on a recipe I found and took out the nasty things like nutmeg, and added delicious things like carrots and potatoes. Who wants nutmeg in their soup? Gross.

You will need:
  • 1 bunch of broccoli
  • 1 small onion (diced)
  • 2 medium red potatoes (diced)
  • 1/2 cup carrots (shredded)
  • 1/4 cup flour
  • 3 cups chicken or vegetable broth (I prefer chicken)
  • 2 cups grated cheddar cheese
  • 1 cup milk
  • 1 TSP Worcestershire sauce
  • 1 12 oz. can evaporated milk
  • salt & pepper to your liking
  • 2 scallions (to top off your soup, optional but HIGHLY recommended)
You're going to start by cutting up your broccoli, keeping the stems and the florets separate. Finely dice the stems, coarsely chop the florets and - once more - KEEP THEM SEPARATE. Trust me, it's a real pain in the ass to do it afterwards.

Grease up a big soup pot and put it on medium heat. Toss in the carrots, diced onions, potatoes, and broccoli stems. Make sure to stir them up a lot until the vegetables are tender, about 10 minutes. Sprinkle in the flour next and stir it around until it becomes toasted which should take about 2 minutes.

While you have the vegetables sauteing, prepare a small saute pan with 1/2 cup of water and dump in the broccoli florets. Bring the florets to a boil and steam them until they're crisp and bright green, about 5 minutes.

Now is the time to stir in your broth and bring it to a boil. Reduce the heat to keep the pot on a steady simmer. Stir the pot every occasionally until the vegetable are soft and the soup is thick, 12-15 minutes.

Empty the broccoli and florets and any remaining water into the soup pot. Give it a stir and then add the Worcestershire sauce, milk, cheese, and evaporated milk. Add salt and pepper to your taste. Garnish with a little extra cheese and some fresh scallions - you will be addicted to the cheesiness!


This recipe is guaranteed to cure the Winter blues!

Love,

Liz

Wednesday, November 6, 2013

Mama's Crab Cakes

     A magical thing happen here in New England, more magical than the usual Autumn fair that sweeps the nation. I'm sure you've seen the piles of leaves, plump, orange pumpkins and their carved, rotting counterparts, and everything is pumpkin or apple flavored for the next few weeks until everything is peppermint flavored. Most importantly, the fall brings harvest and harvest means roadside farm stands full of freshly picked crops.
     But as I said, here in New England something special happens. The farm stands sell freshly snagged crab meat! Can you believe?!
So my Mama, being of infinite appetite and imagination picked up some of local crab meat and surprised me one night last week.
     You don't need a local supply of fresh crab meat, but most grocery stores carry it in the seafood section. Or you could go the extra hard route and go as far as catching, cooking, and smashing the crab meat out yourself. Either or.


You will need:
  • 1 lb. crab meat
  • 3-4 TBSP mayonnaise
  • 3 TBSP lemon juice
  • 1 egg (beaten)
  • 1/2 red bell pepper (finely chopped)
  • 1/4 cup finely chopped red or white onion
  • 1/2 cup bread crumbs
  • 1/8 TSP cayenne
  • salt & pepper to taste
  • Parsley or chives to taste (finely chopped)
  • 1/4 cup vegetable oil
Mix all ingredients in a large mixing bowl. I like them spicy so put a little extra cayenne than my Mama does.
Using your little hands, scoop up some crab meat and start making patties. This recipes yields about 6-8 patties depending on how big you make them.


Heat your oil to medium-high in a skillet. My Mama hates the greasy smoke from frying stuff so she got an electric skillet that puts out on the porch. On the floor. Like a kook.


Fry the crab for 8-10 minutes on each side. Watch out for falling crumbs and other bits. They'll start to burn in the oil and make it taste funny, so just try and scoop out as much debris as you can.

Isn't she cute, though? Look at her slippers.


 Get a nice creamy ginger salad dressing or just plain old tartar sauce with these little babies. My Mama prefers mayonnaise with capers, and hot chutney mixed in. I like lemon and ginger dressing!


Thanks Mama!

Love,

Liz

Mr. Twiggy wants to know where HIS crab cakes went as Shadow the dog slips by . . .


Monday, June 24, 2013

Spoiled Dog Omelette Treats

This is Shadow!
Like most people my age, I've hit hard times in this economic quagmire we live in. In other words, the Super Chef is SUPER BROKE! Now that I live with my mother again, only organic produce and products enter this domicile. Since my mother graciously lets us (my cats and dog) stay with her, I can't help but think, "Why shouldn't my dog be eating organic, too?"

Then I really started looking at what was is in these dog treats. You see, nothing is "too good" for my "spoily" boy! He's my dog, I raised him - ya know? So I want to give him something that isn't killing him. A lot of these treats contained meat and bone meal, which is pulverized animal bones and meat scraps that aren't fit for human consumption let alone a beloved best friend. There were also many ingredients with names far too long to remember or pronounce paired with a string of numbers to classify the chemical compound. WHOA. This is too many ingredients for a dog biscuit.

See the wonky one?
After the last batch of cheap dog treats, as I mentioned before I am lacking in funds, in which I found a jagged shard of bone, I realized it was time to take matters into my own hands. Also, I concluded that baking my own dog treats was the most viable, and fun, option!

I  scoured the internet looking for suitable recipes, tweaked one to suit my doggie's appetite, and came up with this! Since I used a hard boiled egg and cheese, and my boy is so spoiled, I decided to call them Spoiled Dog Omelette Treat!

You will need:
  • 2 1/2 cups flour (wheat flour or oatmeal can be substituted for flour)
  • 1 egg
  • 1 tsp salt
  • 1 tsp beef or chicken stock (bouillon granules or broth can be substituted for stock)
  • 1/2 cup hot water
  • 1 hard boiled egg (chopped)
  • 1/2 cup shredded cheese
Preheat the oven to 350.

Take a small pot of water and heat it on low-medium heat and add the beef or chicken stock. Stir it every so often until it breaks up in the water.

Mix the flour, raw egg, diluted beef or chicken stock, 1/4 cup shredded cheese, and chopped hard boiled egg in a large mixing bowl with a big wooden spoon. Once it starts getting difficult to stir, dig in! Knead the dough for about 3 minutes. If the dough is too dry add a little bit of water, but not too much or the dough will turn to paste.

Form the dough into a ball and place it on a piece of parchment paper. Sprinkle some flour onto the parchment paper and rub some onto your rolling pin. This will keep the dough from sticking when you're trying to roll it out. Roll out the dough until it's about 1/2 inch thick.

COOKIE CUTTER TIME! This is the fun part, getting creative with the cookie cutters! Dog's don't care what shape their food is, but it's fun for us. I choose a tiny star cookie cutter my mother had. There are lots of different kind of cutters to choose from though, including bone shapes! So cute!

Lightly grease a cookie sheet with olive oil and place the biscuit pieces on the sheet. Top each biscuit with a little bit of the remaining cheese. Throw it in the oven for 30 minutes. Before you think you're done, check the biscuits through with a toothpick.

Of course, you don't want to burn your hungry, hairy friend so wait about 5-10 minutes for these cheesy, eggy wonders to cool. Make sure they've completely cooled down before putting them away. Store them in an air-tight container when your pup isn't chowing down on some Spoiled Dog Omelette Treats!

BEWARE: Not all dogs can digest eggs as well as my boy. Try giving your dog a small piece first and wait a day if your not sure how he'll respond.

Love,

Liz

Tuesday, April 16, 2013

*CONTEST* Enter NOW!! This Is The NACHO Recipe Contest!

Hi Everybody!

The Super Chef has been offline for a while. So to celebrate our (late) return in the New Year, the
Super Chef has come BACK with a hunger for NACHOS! So for this Recipe Contest I demand an offering of nacho recipes! I know they're out there people - so don't hold back. I don't care how elaborate or simple the recipe is, as long as it's yummy and, here's the kicker - HEALTHY. Yup, send in some healthy, happy nachos.


The WINNER with the cheesy nacho goodness wins a copy of Rachael Ray's 30-Minute Get Real Meals. This book shows you how to make meals that are healthy but not tasteless. 30-Minute Get Real Meals holds over 150 recipes for a low carb alternative to our all time favorites, some new classics, and even desserts! Why give up on carbs when you can enjoy them?

Here are the RULES, people:

  • Send in your favorite nacho recipes to SuperCollegeChef@gmail.com or post in the comment section below.
  • You have until May 20th to enter your nacho recipe for a chance to WIN a copy of Rachael Ray's 30-Minute Get Real Meals!!
  • Please, be original, no stealing recipes, folks.

So, I hope everyone is looking forward to a fresh new year of Super Easy Recipes as much as I am!
Keep tuning in for more news on the NACHO RECIPE CONTEST!

Love,

Liz