Showing posts with label chicken. Show all posts

Tuesday, March 18, 2014

Korean Teriyaki Chicken Stir Fry

     Yesterday, I was in a tight spot. I had $40 to cover my groceries and it was my turn to cook dinner that night. I went through a lot of options but I settled on something that had lots of inexpensive vegetables, to make up the bulk of the dish, and a inexpensive cut of meat preferably on sale. Also, more important than anything else - it HAD to be good.
     For the first time EVER, I'm faced with a beau who can produce more in the kitchen than fried eggs. The first meal this guy made me was muscles in a tomato-white wine sauce. What the Hell?! Nobody does that in real life! He's amazing so I can't just slap down some tacos seasoned from a packet anymore.
     Given the circumstances and budget, the fact that he likes Asian cuisine, I picked stir-fry. I am SO GLAD I DID! Needless to say, my beau contributed a lot to this recipe. We used one of his woks, because of course he has more than one! I might have prepped but he had a hand in a lot of the cooking process due to his stir-fry history.

You will need:
  • 1 lb. chicken strips OR chicken breasts, cut into thumb-sized chunks
  • 1 onion, cut into semi-circles
  • 1 red pepper, cut into 2-inch strips
  • 1 small broccoli floret, chopped
  • 1 fat garlic clove, diced
  • 1 chicken bouillon cube
  • fresh ginger, one-inch piece, diced
  • 2-3 carrots, peeled into strips
  • 2 TBSP vegetable oil
  • 3/4 cup Tsang's Korean Teriyaki Stir-Fry Sauce
  • 3/4 cup soy sauce, I like the low sodium kind
  • 1 cup par-boiled rice
  • 2 cups water
      Grab a small, resealable plastic bag and put in the chicken chunks, garlic, ginger, 1/2 cup Tsang's Korean Teriyaki Stir-Fry Sauce, and 1/2 cup soy sauce. Before you seal the bag, try to get out all of the air that you can, then toss it in the fridge for 30 minutes. While the chicken is speed-marinating, this is the time to prepare your vegetables and rice.
     My beau introduced me to par-boiled rice. It's nice and tender and I LOVE IT! Get your water boiling and then break up the bouillon cube in the water, then add the rice and cover. Let the rice boil for about 30-60 seconds then reduce the heat to low. Stir once or twice for the next 15 minutes then turn off the heat and stir. If there's rice sticking to the bottom just put the cover back on for about five minutes then stir. The moisture should lift the rice up off the bottom of the pot.


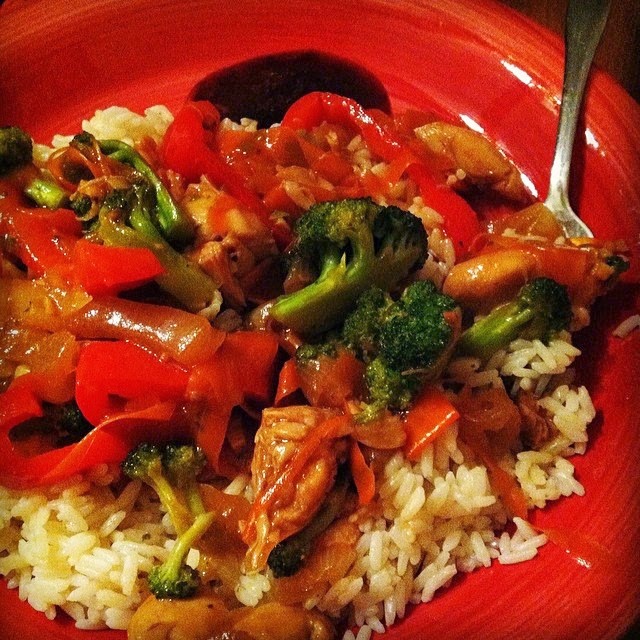
Heat the vegetable oil in your wok or frying pan on medium high heat. Once the oil is hot carefully pour in the chicken mixture, try to get whatever is leftover in the bag out into the pan. Cook the chicken for a about 2-3 minutes. Add the vegetables and the rest of the Tsang's Korean Teriyaki Stir-Fry Sauce and soy sauce.


     Remember: KEEP STIRRING, that's the point of stir-fry. The vegetables should be cooked but still crisp. Stir every 30 seconds or so for the next 10-13 minutes then you're done!
     I like to plate the rice first and then layer on the goodness so the rice soaks up the run off sauces. Scrumpty!

Love,

Liz

Wednesday, February 29, 2012

Easy No-Bake Chicken Parmesan, LEAP DAY!

Happy Leap Day, everyone! To celebrate this rare occasion I present to you a quick and simple no-bake Chicken Parmesan dish.

You will need:
  • 3-4 thin chicken cutlets
  • 2 cups flour
  • 2 TBSP lemon pepper
  • 2 cups shredded Mozzarella cheese
  • 1 TSP salt
  • 1 cup vegetable oil
  • 1 16 oz. box of Ziti pasta
  • tomato sauce
  • grated Parmesan cheese to garnish
Be it store bought or homemade, you'll need some sort of tomato sauce to smother your cheesy, chicken concoction.

Rinse off the chicken cutlets and place them on a paper towel to dry. Season the cutlets with salt. Combine the flour, lemon pepper, and salt in a large Ziplock or plastic grocery bag.


Heat the vegetable oil in a medium sized skillet on medium-high heat. Wait until the oil has a chance to get hot. When that chicken hits the oil, you want it to sizzle!

Take a chicken cutlet and drop it in the flour mixture and shake it up. You're going to want to keep a firm grasp on that bag so you don't get flour all over your kitchen. Make sure the cutlet is totally covered in flour. Place it in the hot oil. Repeat with each cutlet. Let them cook for about 4 minutes on each side. Remove them from the oil and let them dry on a bed of fresh paper towels. These will soak up the extra oil.

While the cutlets are still hot, sprinkle on the Mozzarella cheese and smother them with tomato sauce. Serve with a side of pasta. Don't forget, it wouldn't be Chicken Parmesan without some Parmesan cheese on top!


YUM! Enjoy-a this-s simple-a recipe-a, from-a me to-a you! That's my Italian accent. ENOY!

Love,

Liz


Wednesday, November 2, 2011

Ritz Cracker Crusted Chicken


I crave comfort food as the weather gets colder. The cold wind and gray skies that chill you to the bone and make you hunger for something warm in your belly. And although I'm nowhere near the crispy foliage and gloomy ambiance of Fall in New England, I require sustenance appropriate to the season. I mean, nothing says "Autumn" quite like the palm trees and blue skies of Savannah, GA.

No matter how I've tried it, dipped in egg, slathered in butter, and coated in bread crumbs, I just could get my chicken crispy. My Nanna always made the best everything, as I'm sure you know if you've taken a gander at most of my recipes. She uses Depression-era common sense with modern cooking conveniences that give her recipes the homey, old world quality that fills up any tummy with scrumptiousness.

Here's what you need to make extra crispy chicken skin with a delicious sweet and salty cracker crust:

  • 1 sleeve of Ritz Crackers
  • 6-8 chicken legs, with or without skin
  • 1/2 cup mayonaise
  • salt
  • pepper
Preheat your oven to 325-350.

In a sandwich bag, break up all the crackers into tiny crumbs. Season with salt and pepper.

Wash off the chicken legs and dry them on a couple of paper towels. Season them lightly with salt. Use a spatula or spoon to coat each chicken leg with mayonnaise.

There's two ways you can Ritz up the chicken legs. You can either shake them up in a Ziplock bag or grocery bag. Sometimes this gets all the other crumbs moist, though, and I don't like that.

The other option is to spread out your crumbs on a small plate with a rim to prevent spillage. Dump more bread crumbs over the legs. Keep rolling the chicken leg around over the crumbs until its fully coated. Press the crumbs in to make sure they stick.

Rip off a sheet of parchment paper to line a small baking pan. Place chicken legs evenly on the baking pan. Sprinkle with salt and pepper. Bake for 30-40 minutes.

Serve with mashed potatoes and stuffing on the side. Well, I like mashed potatoes and stuffing on the side of everything, really.


Love,

Liz


Wednesday, October 24, 2007

Cornflake Baked Chicken


Something wonderful happened - not only did I get a flash drive so I can put pictures in now, but I found a freaking awesome chicken recipe!! It's amazing. I made it for dinner tonight. This was the first time I've ever made a chicken dish and it came out perfectly. This is SUCH an easy recipe, perfect for first time chicken cookers. I got it at yahoo in the food section. So let's bust a move:

• 4 skinless chicken legs
• 4 skinless chicken thighs
• salt
• ground pepper
• 1 large eggs
• 2 cups of crushed cornflakes
• 1 tablespoon of olive oil
• ½ teaspoon of cayenne powder (optional, but HIGHLY recommended)

Get that oven preheated at 400 degrees, to start off.
Rinse the chicken and pat it dry. Like I said this was my first time with chicken, so yeah, it feels totally nasty. The easiest way to clean the chicken is to first set out some paper towels to set the raw chicken on after you rinse it. Then, pat it dry with another paper towel. After you’ve dried the chicken, season it generously with salt and pepper.

In a soup bowl, whisk the egg with a tablespoon of water. In a large bowl, crush the two cups of cornflakes with your hands until they’re nice and little and then mix in the oil, a teaspoon of salt, and the cayenne if you’d like your chicken with a little spice!

Get out a baking pan with a rim and cover it with some aluminum foil.


Now dip one piece of chicken in the egg mix and then into the cornflakes (it’s okay if some of the salt and pepper comes off the chicken). Make sure you get them cornflakes on every bit of the chicken by pressing them on and then put it on the pan. Do this with every piece of chicken.

You might end up needing more cornflakes, just to let you know. I doubled the recipe because we eat a lot in my house and I like leftovers. But doubling the recipe wasn’t really enough for ten pieces of chicken instead of eight. So I figure you might run out, maybe.

Once you’re done with the chicken, put it in the oven for thirty minutes or until its golden brown and crisp. After thirty minutes, my chicken came out perfectly! I was so happy! It was so moist and flavorful, YUM. Well, when it’s done, sprinkle the chicken with salt and pepper.

For side dishes, I recommend: mashed potatoes and salad, green beans and potatoes au gratin, or French fries and cold slaw. Personally, I had mashed potatoes and salad, but those other two options sound awesome, too!


On a separate note, my boyfriend made some fantastic chili the other night. I put up the recipe on wikihow.com. I might put it up on this blog as well at a later date.

Anyways, I had a really good time making this chicken. It was new and fun and, more importantly, so friggin’ good! I hope y’all enjoy it as much as I did.

Love,

Liz